
Common signals include water stains or damp spots, missing, cracked, or curling shingles, granules collecting in gutters, and a sagging or uneven roof deck. Persistent leaks after rain or snow, damaged or loose flashing at vents and chimneys, and visible daylight in the attic indicate envelope failures. Rising energy bills and poor attic ventilation suggest inefficiency. Roofs nearing end-of-life warrant assessment for systemic decline. These indicators support timely inspection, targeted repairs, or replacement—further guidance clarifies diagnosis and action.
Key Takeaways
- Water stains, damp spots, or active drips after rain indicate flashing or underlayment failure and require prompt inspection.
- Missing, cracked, curling shingles or excess granules in gutters signal accelerated shingle wear and reduced protection.
- Sagging or uneven roof decking suggests structural deflection or rot and needs immediate evaluation.
- Daylight visible in the attic or around penetrations indicates breaches allowing water and debris entry.
- Persistent moss, algae streaks, or moisture readings point to poor drainage/ventilation and potential hidden damage.
Water Stains or Damp Spots on Ceilings and Walls
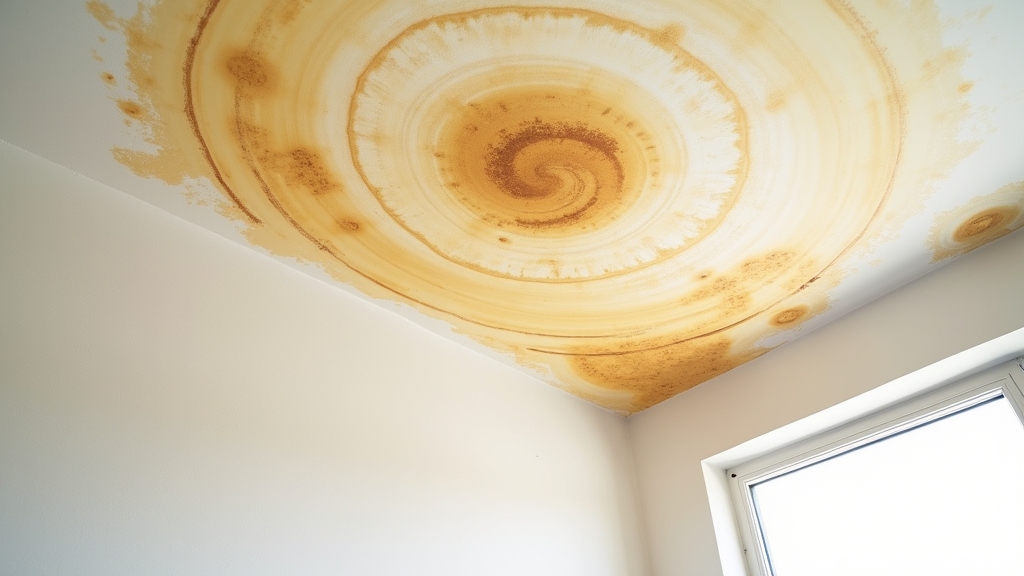
Water stains or damp spots on interior ceilings and walls typically indicate moisture intrusion through the roofing system or associated components. Such staining often results from compromised flashing, degraded underlayment, failed sealants at penetrations, or clogged gutters that force water beneath roof edges.
Discoloration patterns—ringed stains, spreading patches, or sagging drywall—signal ongoing water damage rather than a one-time event.
A systematic ceiling inspection should trace the stain’s geometry, check adjacent wall cavities with a moisture meter, and verify humidity levels to differentiate roof leaks from condensation or plumbing issues.
Inspectors should review attic conditions: wet insulation, darkened sheathing, rusted fasteners, and daylight at penetrations.
Timely mitigation includes drying affected materials, addressing ventilation deficits, and repairing leak pathways to prevent structural deterioration, mold growth, and electrical hazards.
Missing, Cracked, or Curling Shingles
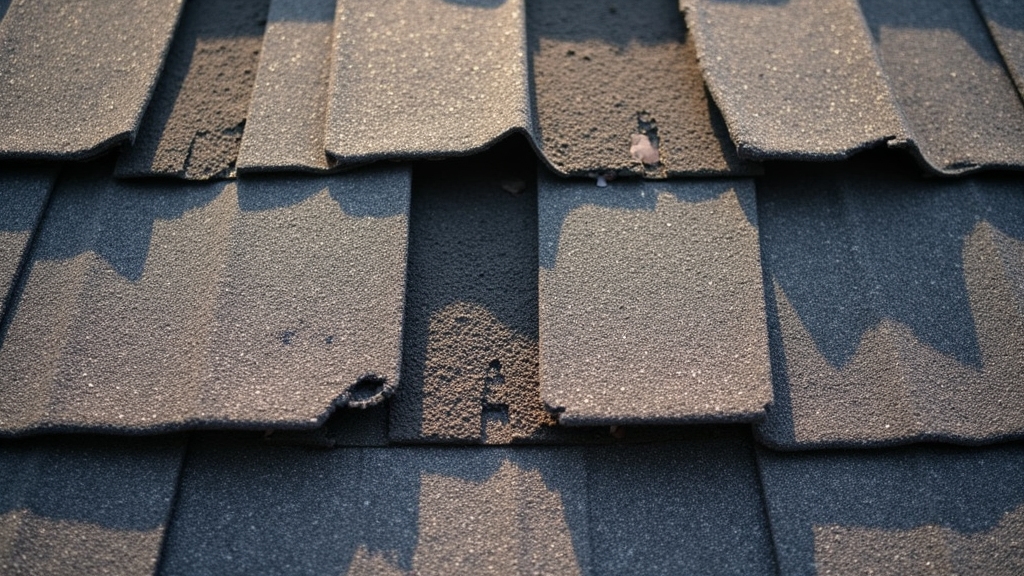
Missing, cracked, or curling shingles typically result from UV degradation, thermal cycling, wind uplift, mechanical impact, or installation defects.
Indicators include displaced tabs, fractured edges, granule loss exposing asphalt, lifted corners, and irregular shingle profiles visible from ground-level sightlines or close inspection.
Localized defects warrant spot repairs, while widespread aging, pattern failure, or moisture intrusion into the underlayment justifies full or sectional replacement.
Causes of Shingle Damage
Shingle deterioration stems from a combination of mechanical stress, environmental exposure, and material aging. Shingle wear accelerates when ultraviolet radiation oxidizes asphalt binders, causing brittleness and surface granule loss. Thermal cycling induces expansion-contraction fatigue, promoting cracks and edge curling. Wind uplift exploits loosened sealant bonds, leading to missing units. Environmental factors such as hail create impact fractures, while moisture drives blistering and substrate rot that undermines fastener retention. Poor attic ventilation traps heat, baking shingles from beneath and shortening service life. Manufacturing variability and improper installation further reduce tolerance to loads and weather.
| Cause | Primary Effect |
| UV/thermal cycling | Brittleness, cracking, curling |
| Wind uplift | Seal failure, missing shingles |
| Moisture/ventilation defects | Blistering, deck decay |
| Impact (hail/debris) | Fractures, granule loss |
How to Spot Issues
Diligence during visual inspections reveals early indicators of roof distress. A methodical roof inspection focuses on shingle continuity, surface integrity, and edge geometry. Missing shingles expose underlayment, accelerating moisture intrusion.
Cracked shingles indicate material embrittlement from UV cycling; hairline fractures often radiate from nail heads or thermal stress points. Curling or cupping suggests adhesive failure, ventilation imbalance, or heat aging, allowing wind uplift and capillary water entry. Granule loss concentrated in gutters signals surfacing wear and reduced UV protection.
Observations should be recorded with date-stamped photos and grid-based roof mapping for trend analysis.
- Identify gaps where tabs are absent
- Note fractures, splits, or crescent cracks
- Observe upward or downward shingle curl
- Check ridge, valley, and eave terminations
- Inspect flashing changes for displacement
Practical maintenance tips include clearing debris, improving attic ventilation, and scheduling seasonal inspections.
When to Repair vs. Replace
When is a spot fix sufficient, and when is a full system change warranted? The decision hinges on extent, location, and shingle age. Isolated missing, cracked, or curling shingles on a young roof often justify targeted repairs, delivering clear repair benefits: restored water-shedding, minimal disruption, and preserved warranties when done to spec. However, widespread granule loss, pervasive curling, soft decking, or recurrent leaks signal systemic failure where replacement costs, though higher upfront, alleviate escalating damage.
| Indicator | Action |
| <15% area affected; deck sound | Repair |
| Multiple slopes affected; aging roof | Replace |
| Frequent leaks; failed flashing/underlayment | Replace |
Professionals assess attic moisture, fastener pull-through, and shingle pliability. If UV brittleness or thermal cracking is generalized, replacement guarantees long-term integrity and predictable life-cycle economics.
Granules Collecting in Gutters or at Downspouts

Evidence of accelerated shingle wear often appears as accumulations of ceramic granules in gutters or at downspouts. These particles shield asphalt from ultraviolet degradation; when they shed excessively, the shingle mat is exposed and ages rapidly.
Understanding granule significance helps distinguish normal weathering from failure modes triggered by hail impact, foot traffic, defective bonding, or end-of-life erosion. Routine gutter maintenance allows early detection by revealing sudden increases after storms.
- Indicates protective UV layer loss and diminished shingle service life
- Often correlates with blistering, hail bruises, or thermal cycling damage
- Concentrations near downspouts reveal slope-specific distress patterns
- Dark, bald shingle patches typically follow heavy granule loss
- Requires documentation and prompt inspection to target localized repairs
If granules continue to shed, schedule an evaluation to verify substrate integrity and prevent moisture intrusion.
Sagging or Uneven Roof Deck
Sagging or an uneven roof deck signals structural deflection that can stem from undersized or damaged framing, prolonged moisture exposure, deteriorated sheathing, or excessive loads from snow and equipment.
Visible dips between rafters, waviness along eaves, or ridgelines out of plane indicate compromised structural integrity requiring prompt evaluation. Deformation concentrates stresses, loosens fasteners, and can propagate cracking in the roof deck and framing members.
A systematic assessment should verify rafter span and spacing, check for rot at bearing points, probe sheathing for delamination, and confirm ventilation that limits moisture accumulation.
Laser levels or string lines help quantify deflection. Remediation may include sistering or replacing rafters, upgrading sheathing thickness or grade, adding mid-span bracing, and redistributing rooftop loads.
Early intervention reduces repair scope and cost while restoring performance.
Persistent Leaks After Rain or Snow
Although occasional drips can result from wind‑driven rain or ice dams, leaks that recur after routine precipitation indicate chronic envelope failures.
Persistent infiltration typically stems from compromised flashings, failed underlayment, deteriorated sealants, or fastener back‑out. A disciplined response begins with systematic leak detection and moisture assessment to trace pathways from entry to interior finishes, distinguishing capillary intrusion from vapor diffusion and wind pressure effects.
Persistent leaks often trace to flashing, underlayment, sealant, or fastener failures—diagnose paths, differentiate mechanisms, then remediate.
- Inspect penetrations: chimneys, skylights, vents, and satellite mounts for flashing discontinuities.
- Evaluate step and headwall interfaces where cladding shifts concentrate runoff.
- Probe underlayment at eaves and valleys for punctures, laps, or UV degradation.
- Verify shingle or membrane uplift, edge terminations, and fastening patterns.
- Use infrared thermography and calibrated moisture meters to map wet substrates.
Prompt corrective action prevents substrate decay, insulation loss, and interior damage.
Mold, Moss, or Algae Growth on the Roof
Why do dark streaks, green mats, or velvety films appear on roof surfaces? These growths indicate sustained moisture retention, limited ultraviolet exposure, and nutrient availability from organic debris or mineral fillers in shingles.
Algae (often Gloeocapsa magma) causes black streaking; moss forms spongy cushions that trap water; molds colonize damp substrates. Left unmanaged, they accelerate shingle granule loss, elevate capillary moisture uptake, and promote premature material degradation.
Inspection should verify shading patterns, clogged gutters, and ventilation adequacy.
Algae removal requires low-pressure application of approved biocides and thorough rinse protocols, avoiding surface abrasion. Moss should be gently detached after desiccation. For mold prevention, reduce shade, improve attic ventilation balance, and maintain debris-free roof planes.
Zinc or copper strips provide ongoing biostatic control. Timely remediation limits structural consequences.
Damaged or Loose Flashing Around Vents and Chimneys
Damaged or loose flashing at vents and chimneys is a primary pathway for water intrusion, with leaks often originating at seams, laps, and counterflashing connections.
Inspection should confirm corrosion, cracked sealant, lifted edges, and gaps where flashing meets masonry or vent boots.
Proper correction involves removing failed sealants, re-seating or replacing flashing components, fastening per manufacturer standards, and sealing all joints with compatible high-grade flashing cement or elastomeric sealant.
Common Leakage Points
Among the most frequent sources of roof leaks are failed flashing assemblies at penetrations—particularly around plumbing vents, exhaust stacks, and chimneys.
These are common culprits because thermal cycling, wind uplift, and sealant breakdown create gaps that channel water beneath shingles and underlayment.
Effective leak detection focuses on junction points where metals meet membranes or masonry, noting capillary pathways and fastener penetrations.
Typical indicators include rusted flashing, missing counterflashing, cracked rubber boots, and displaced storm collars.
Observers should trace stains from attic sheathing to exterior penetrations to confirm the entry point rather than the drip location.
- Vent pipe boots split at the cone
- Chimney step flashing gaps at shingle lifts
- Counterflashing pulled from mortar joints
- Storm collars loosened on metal stacks
- Nail holes or fasteners backing out
Repair and Sealing Steps
With leak-prone areas identified at vents and chimneys, remediation centers on restoring watertight flashing assemblies and terminations.
Inspection verifies metal integrity, fastener seating, counterflashing embedment, and step-flashing overlaps. Effective repair techniques begin with removing debris, failed mastics, and oxidized metal. Corroded or deformed pieces are replaced with properly gauged flashing, hemmed edges, and minimum 4-inch overlaps, shingled to shed water.
Counterflashing is reglet-cut or surface-mounted per substrate, then mechanically anchored.
Sealing materials are selected to match movement and exposure: high-modulus polyurethane or silyl-terminated polyethers for metal-to-masonry joints; butyl tapes for laps; high-temperature roofing sealants at vent boots.
Mortar joints are cleaned and primed before sealant application. All penetrations receive new storm collars, tightened and sealed, and terminations are checked after curing.
Sunlight Visible in the Attic or Daylight Through Roof Boards
A thin blade of daylight across attic rafters indicates a breach in the roof’s weather barrier. During an attic inspection, visible light penetration through sheathing gaps, failed flashing, or displaced shingles signals paths for water intrusion and wind-driven debris.
Observers should note whether light appears at fastener holes, along ridge or hip lines, or near roof penetrations such as vents and chimneys.
Note light at fastener holes, ridge or hip lines, and around vents or chimneys.
- Confirm source: gaps in roof boards versus intentional ventilation openings.
- Map locations of light to roof planes for exterior correlation.
- Check for staining, rusted nails, or fungal growth adjacent to light points.
- Evaluate underlayment integrity; daylight may indicate torn or absent membrane.
- Document extent and pattern to prioritize targeted repairs and prevent structural degradation.
Rising Energy Bills and Poor Attic Ventilation
Inefficiency often traces back to an attic that cannot exhaust heat and moisture. When ventilation is restricted, attic temperatures spike, vapor condenses, and roofing materials deteriorate. The HVAC system works harder to offset heat gain or loss, eroding energy efficiency and inflating utility costs. Ice dams, mold growth, and compressed insulation further reduce insulation effectiveness, compounding thermal imbalance.
| Indicator | Technical Cause | Consequence |
| Summer heat buildup | Inadequate soffit/ridge airflow | Elevated cooling loads |
| Winter moisture | Vapor trapped under decking | Mold, reduced R-value |
| Uneven temperatures | Blocked baffles | Hot/cold rooms |
Verification involves measuring attic temperature and humidity against outdoor baselines, inspecting soffit intake and ridge exhaust, and confirming unobstructed airflow paths. Restoring balanced ventilation and repairing roof penetrations stabilize thermal conditions and reduce bills.
Roof Age Exceeding Its Expected Lifespan
Roof age is a primary indicator of serviceability, with typical lifespan ranges—e.g., 15–25 years for 3-tab asphalt, 25–35 years for architectural asphalt, 30–50 years for metal, and 40–60+ years for tile or slate—guiding expectations.
Once a system approaches or exceeds its rated life, failure risk rises due to cumulative UV degradation, thermal cycling, and material fatigue. At this threshold, owners should assess whether targeted repairs can safely extend performance or whether a proactive full replacement is the economically and technically sound option.
Typical Lifespan Ranges
For most roofing systems, service life follows predictable ranges that signal when replacement becomes more prudent than repair.
Typical roof lifespan varies by material and climate exposure. Three-tab asphalt often lasts 15–20 years; architectural asphalt 20–30. Wood shakes may reach 25–35, while standing-seam metal commonly achieves 40–60. Concrete and clay tile frequently extend 40–70, and slate can exceed 75–100 when properly maintained.
Ultraviolet load, ventilation quality, and installation accuracy materially affect outcomes. Owners should benchmark age against the expected range and intensify inspections as the upper limit approaches.
Practical maintenance tips include controlling attic humidity, clearing debris, and sealing penetrations.
- Verify installation date and material grade
- Compare age to manufacturer data
- Audit ventilation and insulation
- Document annual inspection results
- Track repairs indicating end-of-life trends
Replacement vs. Repair Timing
When a roof surpasses its rated service life, the default assumption shifts from repair to replacement. At this stage, material degradation accelerates, leak frequency increases, and warranties typically lapse.
Decision-making should weigh residual serviceability against escalating repair costs and risk exposure. Aging membranes, embrittled shingles, corroded flashings, and fatigued fasteners indicate systemic decline rather than isolated defects.
A structured assessment compares the remaining roof lifespan to lifecycle cost. If projected annual maintenance plus anticipated leak remediation exceeds the amortized cost of a new system, replacement is warranted.
Moisture surveys, core cuts, and deck evaluations quantify hidden damage, informing scope. Replacement also enables code upgrades, improved insulation, and better wind/hail resistance, reducing future liabilities.
Limited spot repairs suit localized damage only when substrates remain dry and stable.
Frequently Asked Questions
How Often Should a Professional Inspect My Roof Each Year?
Twice annually is recommended. This roof inspection frequency enables timely detection of wear, weather damage, and system failures. A professional evaluation should also follow major storms or rooftop work, with documentation supporting warranty compliance, lifecycle planning, and proactive maintenance scheduling for peak performance.
Will Minor Roof Repairs Affect My Home Insurance Coverage?
Yes—minor roof repairs typically do not void roof insurance, but documentation matters. Insurers assess coverage implications based on maintenance records, material compliance, licensed contractors, and pre-existing damage. Thorough invoices, photos, and permits help preserve eligibility, deductibles, and claim outcomes.
What Permits Are Required for Roof Repairs in My Area?
Permits typically include a local building permit; scope determines inspections under roofing regulations. He should confirm zoning overlays, historical district approvals, HOA consent, and contractor licensing. Emergency tarping may be exempt. Always verify fee schedules, documentation, and inspection sequencing with the authority having jurisdiction.
How Do Seasonal Weather Patterns Affect Repair Timing and Materials?
Seasonal weather patterns dictate repair windows and specifications. Seasonal impacts include temperature swings, moisture load, and UV exposure, which influence curing times and fastener performance. Material durability considerations prioritize cold-flexible membranes, heat-tolerant sealants, corrosion-resistant fasteners, and moisture-tolerant underlayments, scheduled during stable, dry conditions.
What Warranties Should I Expect From Roof Repair Contractors?
They should expect two warranty types: workmanship and materials. Workmanship terms cover labor defects; materials follow manufacturer limits. Contractor obligations include written scope, transferability, claim procedures, exclusions, maintenance requirements, and duration benchmarks (1–10 years workmanship; materials prorated, often 10–50 years).
Final Thoughts
Catching roof issues early—stains, missing shingles, granule loss, sagging decks, chronic leaks, flashing gaps, attic daylight, poor ventilation, rising energy bills, or end-of-life age—prevents structural damage, keeps warranties intact, and saves money. The fix is a disciplined approach: document symptoms, verify with moisture readings, correct ventilation (balanced intake/exhaust), reseal or replace compromised components, and upgrade drainage so water moves off the roof—not into it.
If any of these signs are showing up at your home, bring in a pro who can diagnose the whole system and repair to spec. Rochester Hills Roofing Pros offers thorough roof inspections, targeted repairs, and full roof replacements for asphalt, metal, and flat roofs. They serve Rochester Hills and nearby areas including Troy and Sterling Heights, with options for both residential and commercial projects—and helpful guidance on choosing the right contractor.
Ready for a professional opinion or a fast repair?
Get a clear plan and a free estimate—contact Rochester Hills Roofing Pros today.